I know there are others out there and people can do this too but I will put this here for convenience sake.
Update : Removed Test Mode Watermark
Download : http://www.mediafire.com/download/wbeg0cmak467fm0/Windows_8.1_watermark_removal.zip
Instructions:
-Run Add_Take_Ownership
-Take ownership of C:\Windows\Branding\Basebrd\en-US\basebrd.dll.mui and replace with edited basebrd.dll.mui
-Take ownership of C:\Windows\System32\en-US\shell32.dll.mui replace with edited shell32.dll.mui
-Logout and back in
Monday, October 28, 2013
Friday, October 25, 2013
DRIICE Project
This is meant to be an alternative to the recent "ice" project for steam made by scottrice. There are certain things that I saw about his project that I would like to change. One of which is a nice GUI to use (I know there is work being done already). I have been working on it for the past week or so (on and off) although following a language I don't know makes things sluggish and cumbersome. The actual program itself is quite simple, and so finishing my alternative should be fairly easy.
Progress (99 = done but might make changes):
GUI : 0% "Will work on this last, I usually get functionality working before esthetics."
Names and Categories : 99% "Am able to generate properly formatted screenshot.vdf files for name of app, location, category, etc."
AppID generation : 60% "Currently working on this, This is the key to generating another properly formatted screenshot.vdf file (dif location/dif format) that handles id to game association also used for grid images. I got have the generation and formatting done, just the correct appid is left"
App/image association : 80% "Am able to pick images and move them to the correct location and with correct demensions, but giving them their correct file name (same as appid) is pending on me getting AppID generation working."
== LOG ==
May 13, 2014: Officially dropped.
Oct 25, 2013: Until now I haven't been seriously working on it but today I will sit down with paper and pencil (yes I code with scrap paper - it helps me, don't laugh) and really work on it through the day. Although sometime today my little brother's computer case is to come and I will have to put his computer together which is currently housed in the motherboard box, fully functional lol.
Thursday, October 17, 2013
+DeSmuME for ICE , ugly fix for NDS support
Here is a little thing that I worked up, its similar/same method as the previous fix for ICE. This one add NDS emulator (DeSmuME).
Instructions: Rename your original Gameboy advance emulator to "gbaemu.exe", ex: "VisualBoyAdvance.exe" to "gbaemu.exe" and extract the NDS folder into the same directory. Add NDS games by placing them into the GBA roms directory.
Download : http://www.mediafire.com/download/z3h482mgk53r2rf/%2BDeSmuME.zip
SteamGridImager
Made to batch re-size and convert images for Steam grid.
Latest Update : Version 2.0c:
Changed a couple things here and there and added some options.
Changes :
There is now a mode displayed in the console so people know what options are being used.
There are now two quality options (highspeed/highquality) highspeed is used by defualt.
There is now a way to specify the number of threads to use. Specifying 0 will behave the same way as not specifying one at all.
A usage message is added for people who run the application normally.
Download : http://www.mediafire.com/download/xvwc9ooocfy9yb5/SteamGridImager2.0c.exe
Usage: Drag images or folders containing images on the executable.
If you would like to benchmark add "-bench" without quotes to the file name.
If you would like to use high quality mode add "-q" without quotes to the file name.
If you would like to specify number of threads to use add "-thread=" followed by the number of threads you want to use (no spaces, without quotes) to the end of the file name.
You can use multiple modes at the same time.
Because most of this was from an old application and uses most of .Net built in stuff I will provide the source:
== OLD == Benchmark done by Pbanj:
2.0b HighSpeed CPU utilization

2.0b HighSpeed

2.0b HighQuality

Download :http://www.mediafire.com/download/o3jrga30povdn5f/SteamGridImager.exe
Update : Its fucked up, here is a fixed version:
Download : http://www.mediafire.com/download/z190ztoo3cwy1uy/SteamGridImager1.0a.exe
Reason : I was using an old project to make this one, and I decided to change the output format to Jpeg from Png, but I forgot to change the extensions from .png to .jpeg. I am sorry for any inconveniences.
Update : Here is another update I was told that the images were pixelated and I knew what was causing it. Microsoft's built in Jpeg compressor in .NET is shitty, and so to remedy that I simply made it output PNG. Another thing that is changed is I removed the ending popup message because apparently Pbanj thought it was annoying.
Download : http://www.mediafire.com/download/hhviob9mafizg9l/SteamGridImager1.0b.exe
Requested : Pbanj requested that I implement multi-threading to this. And so I might do just that, just to speed up batch processing. For single image processing there will be no speed improvements.
Updates : Here is SteamGridImager1.0c and the first version of SteamGridImager2.0.
Download 1.0c : http://www.mediafire.com/download/t2tu6orzv33e2m2/SteamGridImager1.0c.exe
Changes : Added folder support, if you have too many images to process put them into a folder and drag the folder onto SteamGridImager1.0c.exe, all images in the folder and sub-folders will be processed. Also added a benchmark feature for people who want to see stats, simply add "-benchmark" (without quotes) to the end of the executable file name.
Download 2.0 : http://www.mediafire.com/download/b8gbuiebc71di3f/SteamGridImager2.0.exe
Info : This is 2.0 because it was more or less a rewrite of the first version. This version is an attempt to implement multi-threading. Minimal testing was done so performance increases may vary. Also to note I do not know best practices of multi-threading to make optimized multi-threaded apps yet, the only thing I'm certain of is there is a performance gain and that it works lol. Further optimization of the app will probably not come as unless you are processing thousands of files its not going to make that big of a difference. Supports everything 1.0c supports feature wise.
Benchmarks :
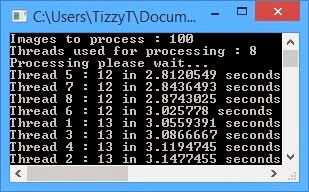
Here are the two version processing 100 images =
Version 1.0c
 Version 2.0
 Here are the two versions processing 2000 images =
Version 1.0c
Here are the two versions processing 2000 images =
Version 1.0c
 Version 2.0
 As you can see the multi-threading does provide some performance gain (at least on my system) but quite little (probably due to my lack of knowledge on multi-threading). Welp take it or leave it lol.
On second thought : I will try later to implement multi-threading another way and see if that yields better performance.
Welp here is the other way I've implemented Multi-threading, its better I guess but again not by much lol. Features and usage is the same.
Download 2.0a :
As you can see the multi-threading does provide some performance gain (at least on my system) but quite little (probably due to my lack of knowledge on multi-threading). Welp take it or leave it lol.
On second thought : I will try later to implement multi-threading another way and see if that yields better performance.
Welp here is the other way I've implemented Multi-threading, its better I guess but again not by much lol. Features and usage is the same.
Download 2.0a : http://www.mediafire.com/download/a4fpt3264qlo5r2/SteamGridImager2.0a.exe
Difference explained : 2.0 has a list of all the images and each thread can grab a new one as soon as its finished with the current one its working with. Each time a thread grabs an entry, that entry is removed from the list so other threads don't process that image a second time.
2.0a gives each thread its own list of images to work with. It works non-stop until it finishes. There is no waiting like 2.0 does. In 2.0 all the threads are grabbing from one source so there needed to be some form of management. If multiple threads try to access the list at the same time, all but one thread is put on hold until that one thread is finished with the list, basically the other threads need to wait in line until they get the information needed to work on the next image. Another factory that might be making my tests seem like multi-threading isn't gaining much might be a HDD bottleneck.
2.0a benchmark with the same test from earlier.
100 images:
 2000 images:
 CPU Utilization:
 Testing done by Pbanj:
1.0c
Testing done by Pbanj:
1.0c
 2.0
2.0
 2.0a
2.0a

Latest Update : Version 2.0c:
Changed a couple things here and there and added some options.
Changes :
There is now a mode displayed in the console so people know what options are being used.
There are now two quality options (highspeed/highquality) highspeed is used by defualt.
There is now a way to specify the number of threads to use. Specifying 0 will behave the same way as not specifying one at all.
A usage message is added for people who run the application normally.
Download : http://www.mediafire.com/download/xvwc9ooocfy9yb5/SteamGridImager2.0c.exe
Usage: Drag images or folders containing images on the executable.
If you would like to benchmark add "-bench" without quotes to the file name.
If you would like to use high quality mode add "-q" without quotes to the file name.
If you would like to specify number of threads to use add "-thread=" followed by the number of threads you want to use (no spaces, without quotes) to the end of the file name.
You can use multiple modes at the same time.
Because most of this was from an old application and uses most of .Net built in stuff I will provide the source:
== OLD == Benchmark done by Pbanj:
2.0b HighSpeed CPU utilization
2.0b HighSpeed
2.0b HighQuality
Download :
Monday, October 14, 2013
ArgumentChecker
This little app is for people who want to know what a particular executable (windows exe) is being given as arguments.
Usage: Put in the same location as the executable you want to check and rename the original to something else, and rename ArgumentChecker to the original name of the program. If there are any arguments a new text file is created in the same location listing the arguments used, if there are no arguments "NO ARGS" (with quotes) will be in the list. In the message version it behaves the same except that instead of outputting a file a popup box comes up listing the arguments.
Download : http://www.mediafire.com/download/x383bhqnnnnobjr/ArgumentChecker.exe
Message version: http://www.mediafire.com/download/8h1fvl5x2t239t6/ArgumentCheckerMsg.exe
Steam ICE Snes9x + Bsnes temp ugly fix
Here is a little thing I put together as a temp fix for people who want to use the snes9x emu for snes games and bsnes for nes games. There might have been an easy way to do this but watching someone try to get it working made me not look for an easy solution lol. So here it is:
Download : http://www.mediafire.com/download/2z0ctdb21q59i3c/Winbsnes%2BSnes9x.zip
Instructions : Delete or Rename or Backup the bsnes.exe, found here
"C:\Users\<USER>\AppData\Local\Scott Rice\Ice\Emulators\Winbsnes".
Then extract everything in the archive into that directory (overwrite if asked).
Changes :
- No visible console.
- Doesn't conflict with ICE
To Update Emus:
Put all Snes9x related files in the Snes9x folder.
For Bsnes update files and then rename the updated bsnes.exe to bnesemu.exe and then extract/use the bsnes.exe from the archive.
Alternatively if you would like a different NES emulator (FCEUX) you can use a package that uses the same method put together by Pbanj here : http://www.mediafire.com/?icr12m5lpytac2l
Thursday, October 3, 2013
Data2BW
Ada thought it be a good idea to give me something to do to relax when I was stressing. I was at first more confused with what she wanted then neither relaxing or stressing. I finally understood what she handed me, it was a challenge (don't know if one can call it that lol). She gave me a file, told me it is actually an image. It was 128 bytes. The image is in black and white and dimensions were 32x32. With that in mind I already knew what I needed to do, each bit = black or white. And so here is the completed app.
Download folder: http://www.mediafire.com/folder/z1ytx6r9qde98/DATA2BW
There are different executable for different orientations, only because I don't know what she was talking about when she said the image is reversed/flipped etc lol.
Download folder: http://www.mediafire.com/folder/z1ytx6r9qde98/DATA2BW
There are different executable for different orientations, only because I don't know what she was talking about when she said the image is reversed/flipped etc lol.
gis2png
This came about when I was wondering why, some gim files weren't able to convert to png using gimconv. I found that gimconv had a -S option which has a portion that looks promising to me. it said "Pixels" followed by what looks like arrays of 4bytes. I immediately interpreted this as 32bit color (red, green, blue, and alpha). So the plan now was to take that array and make a PNG out of it, but I found another problem, the number of pixels in that array didn't match the width x height of the image. So I thought it was because the actual size of the image the pixels would form would be proportionally smaller than the stated width and height. That's when sandungas said he saw a pattern and that the image (at the time) was 36 x 44. And the math matches up. And so if you take the number of pixels / height (which we are assuming is correct) we should get the correct width. And so off I went, putting this little app together, then another problem arose, the order of RGB was different. I asked Ada to hand me a gim that was convertible using gimconv and from that I was able to match the colors (abgr if anyone was wondering), and there we have it. This program converts the gis files made from gimconv into png files. Although it works fine with files that can already be converted normally with gimconv, for files that wasn't able to convert with gimconv this program can convert the gis that was generated but it looks weird. And so I don't know if its correct or wrong (most likely wrong), or if we are missing something lol. Either way I decided to put this here even if it might be useless.
Usages: gis2png.exe <inFile>
gis2png.exe <inFile1> <inFile2> <inFile3> ...
Drag gis file(s) over application
Download : http://www.mediafire.com/download/5kbn4lh51pjbw9z/gis2png.exe
CRC32: 6FFBDD30
MD5: 119936C018C9D1F6200558E17F514B52
SHA-1: BC27D25E0A180A98BA0E9776FD90C51F15CA7EC1
Here is a version that doesn't do the calculations to get width and uses the one found in the gis itself:
Download : http://www.mediafire.com/download/ixqe941bm5imbxt/gis2png.exe
CRC32: FF75528C
MD5: 14B301C3C1C64962E9F8064C41C71C68
SHA-1: E1EDD51062A56E87407FF69EC82780C60AD93116
PS: No one listed will be responsible for the usage, and effects of this program, if there is room for correction/improvement, they might/might not be implemented.
Friday, August 9, 2013
== Learning Hexadecimal ==
Previously we learned to count in binary which is a base 2 system and is used in computers. There are other base systems that the binary system is usually paired with in computers and that is the base 16 system. In hexadecimal there are 16 different digits usable that being 0, 1, 2, 3, 4, 5, 6, 7, 8, 9, A, B, C, D, E, F. the values are 0 to 15 and like in binary and decimal once you go past that you increment and restart the sequence.
Take a look at this:
Lets take the same number as last lesson on binary 3,791 as an example. In hexadecimal that value is ECF. To get a better understanding why the value is what it is, lets convert it to binary. Each digit in hexadecimal can be represented with 4 bits like so:
So in turn the number ECF in binary is:
As you can see it is identical to the previous lesson, the result being 111011001111. You can also use the place value method as well similar to the binary and decimal system but again the place values are different. You again start with 1 and each number afterward is a power of 16.
So using the place value method we do (Ex256) + (Cx16) + (Fx1). You can convert the letters to their respective values if that helps like so : (14x256) + (12x16) + (15x1) = 3,791.
More information can be obtained here : http://en.wikipedia.org/wiki/Hexadecimal
| Decimal | Hexadecimal |
| 0 | 0 |
| 1 | 1 |
| 2 | 2 |
| 3 | 3 |
| 4 | 4 |
| 5 | 5 |
| 6 | 6 |
| 7 | 7 |
| 8 | 8 |
| 9 | 9 |
| 10 | A |
| 11 | B |
| 12 | C |
| 13 | D |
| 14 | E |
| 15 | F |
Lets take the same number as last lesson on binary 3,791 as an example. In hexadecimal that value is ECF. To get a better understanding why the value is what it is, lets convert it to binary. Each digit in hexadecimal can be represented with 4 bits like so:
| Binary | Hexadecimal |
| 0000 | 0 |
| 0001 | 1 |
| 0010 | 2 |
| 0011 | 3 |
| 0100 | 4 |
| 0101 | 5 |
| 0110 | 6 |
| 0111 | 7 |
| 1000 | 8 |
| 1001 | 9 |
| 1010 | A |
| 1011 | B |
| 1100 | C |
| 1101 | D |
| 1110 | E |
| 1111 | F |
So in turn the number ECF in binary is:
| E | C | F |
| 1110 | 1100 | 1111 |
As you can see it is identical to the previous lesson, the result being 111011001111. You can also use the place value method as well similar to the binary and decimal system but again the place values are different. You again start with 1 and each number afterward is a power of 16.
| 256 | 16 | 1 |
| E | C | F |
More information can be obtained here : http://en.wikipedia.org/wiki/Hexadecimal
== Learning Binary ==
Binary is a numeric system that uses the base 2 numeral system. There are only 2 usable digits 0 (or off) and 1 (or on). Binary is the heart of all electronic computers, including but not limited to personal computers, Macs, gaming controls, and cellphones. In computers the only thing it really does is switch between 2 states 0 or 1, from that many combinations we get our digital world as we have it today. In this portion I will be showing how to count in binary.
Take a look at the following:
Do you see the pattern?
In the decimal system we start with 0, and there are 10 usable digits, 0-9. In binary like mentioned there are only 2 digits 0 and 1. In decimal once you get past 9 you simply increment the first digit to the left (if it doesn't exist then pretend its a 0) and start the sequence over. For example: 00,01,02,03,04,05,06,07,08,09 from here we increment to the next digit and start the sequence over again hence we get 10,11,12,13,14, etc.
In binary its the same concept. 00,01 since 1 is our last usable digit we increment and start the sequence over hence 10,11 from here we repeat the same idea hence 100,101,110,111, etc. Now 100 shown here isn't actually 100 like we use in decimal its value is actually 4. Each place value is different, lets compare it to decimal system:
Note: the value 3,791 is randomly used in this comparison.
Decimal:
Binary:
In the decimal system you multiply the number of its place value, and then add the result of each multiplication. So you take (3x1,000) + (7x100) + (9x10) + (1x1) = 3,791.
In binary it is the same process, just that the place values are different, and easy way to remember is it starts with 1 and is doubled each time. So (1x2,048) + (1x1,024) + (1x512) + (0x256) + (1x128) + (1x64) + (0x32) + (0x16) + (1x8) + (1x4) + (1x2) + (1x1) = 3,791. An obvious way to make this faster is ignore the multiplication part because if its 0 it doesn't add to the value and you can ignore it, and if its 1 just add the place value its because anything multiplied by 1 is equal to itself.
Here is a simple converter:
More information can be obtained here : http://en.wikipedia.org/wiki/Binary_number
| Decimal | Binary |
| 0 | 0 |
| 1 | 1 |
| 2 | 10 |
| 3 | 11 |
| 4 | 100 |
| 5 | 101 |
| 6 | 110 |
| 7 | 111 |
| 8 | 1000 |
| 9 | 1001 |
| 10 | 1010 |
| 11 | 1011 |
| 12 | 1100 |
| 13 | 1101 |
| 14 | 1110 |
| 15 | 1111 |
| 16 | 10000 |
| 17 | 10001 |
| 18 | 10010 |
| 19 | 10011 |
| 20 | 10100 |
Do you see the pattern?
In the decimal system we start with 0, and there are 10 usable digits, 0-9. In binary like mentioned there are only 2 digits 0 and 1. In decimal once you get past 9 you simply increment the first digit to the left (if it doesn't exist then pretend its a 0) and start the sequence over. For example: 00,01,02,03,04,05,06,07,08,09 from here we increment to the next digit and start the sequence over again hence we get 10,11,12,13,14, etc.
In binary its the same concept. 00,01 since 1 is our last usable digit we increment and start the sequence over hence 10,11 from here we repeat the same idea hence 100,101,110,111, etc. Now 100 shown here isn't actually 100 like we use in decimal its value is actually 4. Each place value is different, lets compare it to decimal system:
Note: the value 3,791 is randomly used in this comparison.
| 1000 | 100 | 10 | 1 |
| 3 | 7 | 9 | 1 |
| 2048 | 1024 | 512 | 256 | 128 | 64 | 32 | 16 | 8 | 4 | 2 | 1 |
| 1 | 1 | 1 | 0 | 1 | 1 | 0 | 0 | 1 | 1 | 1 | 1 |
In binary it is the same process, just that the place values are different, and easy way to remember is it starts with 1 and is doubled each time. So (1x2,048) + (1x1,024) + (1x512) + (0x256) + (1x128) + (1x64) + (0x32) + (0x16) + (1x8) + (1x4) + (1x2) + (1x1) = 3,791. An obvious way to make this faster is ignore the multiplication part because if its 0 it doesn't add to the value and you can ignore it, and if its 1 just add the place value its because anything multiplied by 1 is equal to itself.
Here is a simple converter:
More information can be obtained here : http://en.wikipedia.org/wiki/Binary_number
By the end of this lesson you will see there are 10 kind of people in this world those who know binary and those who don't.
Thursday, August 8, 2013
[Computer related tutorials]
In this portion I will be making tutorials and help guides for computer related things that I know/learned to help/teach others, I believe knowledge is power and knowledge should be free
::Content::
Learn Binary
Learn Hexadecimal
Learn Any Base Numbering System
::Content::
Learn Binary
Learn Hexadecimal
Learn Any Base Numbering System
Thursday, July 18, 2013
PNG Crush EZ
I have been making some small programs here and there, and here is another. The original program is called PNG Crush by Glenn Randers-Pehrson which is packed inside mine. What I've done is again something that might be useless but here it is. Its basically to make batch processing using PNG Crush easier. Simply group select the PNG files you want processed and drag them onto the PNG Crush EZ executable, it takes care of the rest.
What PNG crush essentially does is removes metadata from PNG files to make them a bit smaller in file size.
== DOWNLOAD ==
http://www.mediafire.com/download/86p6fsvpj8cidk5/PNG_Crush_EZ.exe
Note: The original PNG Crush executable is extracted into the "C:\Windows\Temp" folder.
What PNG crush essentially does is removes metadata from PNG files to make them a bit smaller in file size.
== DOWNLOAD ==
http://www.mediafire.com/download/86p6fsvpj8cidk5/PNG_Crush_EZ.exe
Note: The original PNG Crush executable is extracted into the "C:\Windows\Temp" folder.
Saturday, June 29, 2013
HumanAddition - Addition calculator using human method
==[Update 1]==
Performance Improvements
- Same test as before now takes less than 1 second (~ 700ms)
- Changed the logic up a little to remedy the "different number lengths taking longer" issue, now if
you add a large number with a small one it will be faster than adding 2 same size numbers.
Non-Number Checks
- Removes all characters that are not valid digits
Progress Bar/Report
- Progress loading bar and percentage, but it bugs out on very high numbers like one with 50,000,000 digits
== Download ==
http://www.mediafire.com/download/yz7rjcx3b6k6bmp/HumanAddition.exe
== Code ==
This probably isn't perfect, anyone wanting to make changes are free to, and submit them if you want in to comments.
==Log=
Welp I made another possibly useless simple program lol. This program is a single function calculator in that it only does addition. The purpose of this calculator though is adding two large numbers and presenting every digit. It does this by utilizing how we were taught addition in school, add two numbers starting from the right, if there is a carry, add in the carry. This calculator can be considered slow, any number ~200,000 digits long from what I've seen is practical, larger numbers will obviously be slower, it also depends on what the number is. For 2 random numbers I made both with exactly 200,000 digits, it took 134,369 milliseconds, or 134.369 seconds or, 2.240 minutes.
There is also a bottleneck or bug (what ever you want to called it) somewhere, when adding a large number with one of less digits or vice-verse, it takes longer then adding 2 large numbers of the same number of digits, I might fix it sometime later.
Comments would be nice, If you haven't noticed I am bored and making small programs lol.
Thursday, June 27, 2013
FlipsHorizontal
Here is a simple program I made for a friend it's very simple and actually is my first actual program that I will be showing source for (Below) but only because its so simple that I don't think I made an mistakes anywhere :P .
This program simply flips images on the horizontal axis. The resulting output is in PNG format so keep that in mind though you can change that if you want using the source provided.
== Features ==
Flips images on horizontal axis
Converts to PNG format
== Download ==
http://www.mediafire.com/download/2u84oerqc2aooa8/FlipsHorizontal.zip
== Source ==
Comments would be great, haven't been really active with school being in the way lately.
Monday, February 25, 2013
Manga/Image archiving program
I made this program a while ago due to me starting to collect manga. It was very cluttered and really a complete mess and manga with many page scans just looked ugly in a folder. So to organize my new found hobby I made a simple program that will archive my manga collection into single files known as simple manga pack (.smp). Sure there are other similar programs made for comics and such out already and I've tested them and in some cases my format rivals even them. For now the program is in 2 separate executables, one to create SMPs and one to read them but I plan to implement it all in one program in the near future as their current states are incomplete and is only functional and not final.
Download Simple Manga Packer (creates .smp files)
Download SMP Reader (reads .smp files)
To be implemented:
- Encryption
- Compression
- Volume, Chapter seperation
- Volume, Chapter, Page seeking
- Descriptions
- More Viewing modes
- Extract image sequence from smp
- Importing folders to convert to smp
- smp preview before packing
Current smp limitations and specification (subject to change):
- 65535 scans possible in smp file
- 255 characters possible in smp file
- 16,777,215 Byes max per scan (under 16 MB)
- Only jpeg, png, bmp supported as inputs
As mentioned compression is not implemented yet so it will be larger then other formats out there but it has been tested and results are good.
How to use:
:::packer:::
- run program normally
- drag and drop images into list
- provide a name for the smp
- click pack
:::reader:::
- associate file extention .smp with the reader and open reader by double clicking the smp file you wish to read.
- another way is through dragging and dropping the smp ontop of the excutable
- another way is through command prompt
SMP Reader.exe <input smp file>
Subscribe to:
Posts (Atom)